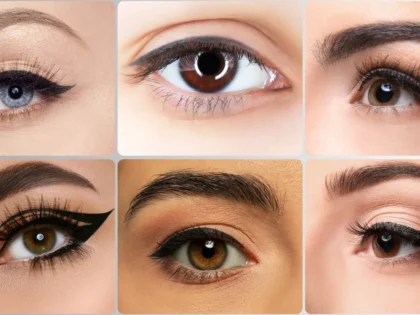
How to apply liquid eyeliner for beginners
-
 avlontech6@gmail.com
 - Posted on
- 0 comments
For Distributors & Wholesalers
We welcome partnerships with distributors and wholesalers who wish to expand their business with a trusted and growing cosmetic brand.
Why Partner with Avlon International?
- Wide range of cosmetics: Nail polish, mascara, kajal, eyeliner, liquid lipstick, lipstick & more.
- Premium quality with competitive wholesale pricing.
- Attractive margins and fast-moving products.
- Assured support with marketing materials & promotional offers.
- PAN India shipping with secure packaging.
📦 Minimum Order Quantity (MOQ): 1 master carton (72 trays)
💰 Special Discounts: Available for bulk & long-term partners.
🚚 Dispatch & Delivery: PAN India in around 10-15 days.
📞 Contact Us:
Phone / WhatsApp: +91 88105 67775
Email: contactus@avloninternational.com
Website: www.avloninternational.com
Apply Liquid Eyeliner for Beginners
Liquid eyeliner can be intimidating for beginners, but with practice and the right techniques, you can achieve that perfect winged look or bold definition that instantly elevates your eye makeup. Whether you’re going for a subtle flick or a dramatic cat-eye, liquid eyeliner gives you the precision and intensity that other types of eyeliner can’t match.
In this guide, we’ll break down everything you need to know about applying liquid eyeliner as a beginner. From choosing the right product to step-by-step application tips, you’ll soon be a pro at creating flawless eye looks.
You may also like:
1. Choose the Right Liquid Eyeliner
Before you dive into the application, it’s important to select the right liquid eyeliner for your needs. There are two main types of liquid eyeliners: felt-tip pens and brush-tip applicators.
- Felt-tip liquid eyeliners: These are ideal for beginners because they offer more control, similar to drawing with a pen. The tip is firm, making it easier to draw precise lines.
- Brush-tip liquid eyeliners: These provide a more flexible, softer application and are great for creating fine, delicate lines. However, they require a bit more practice and a steady hand, so they may be best for those with some experience.
When choosing a liquid eyeliner, look for these features:
- Waterproof formula: This ensures your eyeliner stays put all day, especially if you have oily eyelids or live in a humid environment.
- Long-lasting wear: A good liquid eyeliner should last at least 8–12 hours without smudging or fading.
- Matte or glossy finish: Decide whether you prefer a matte, understated look or a glossy, high-shine finish.
2. Prep Your Eyelids
Before applying any eyeliner, it’s essential to prep your eyelids. Prepping your eyes ensures your eyeliner goes on smoothly and lasts all day without smudging.
- Clean your eyelids: Start with clean, dry eyelids. Remove any excess oil using a gentle cleanser or makeup wipe.
- Apply primer: If you have oily eyelids or want your eyeliner to stay in place all day, apply a small amount of eyeshadow primer. This helps create a smooth base for your liner and prevents smudging.
- Optional: Use eyeshadow: For a more defined look, you can apply a neutral eyeshadow or powder to your eyelids before applying eyeliner. This gives the liner something to adhere to and can enhance the overall look.
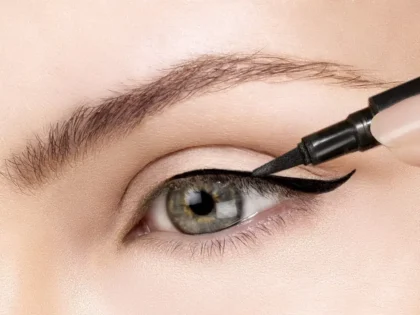
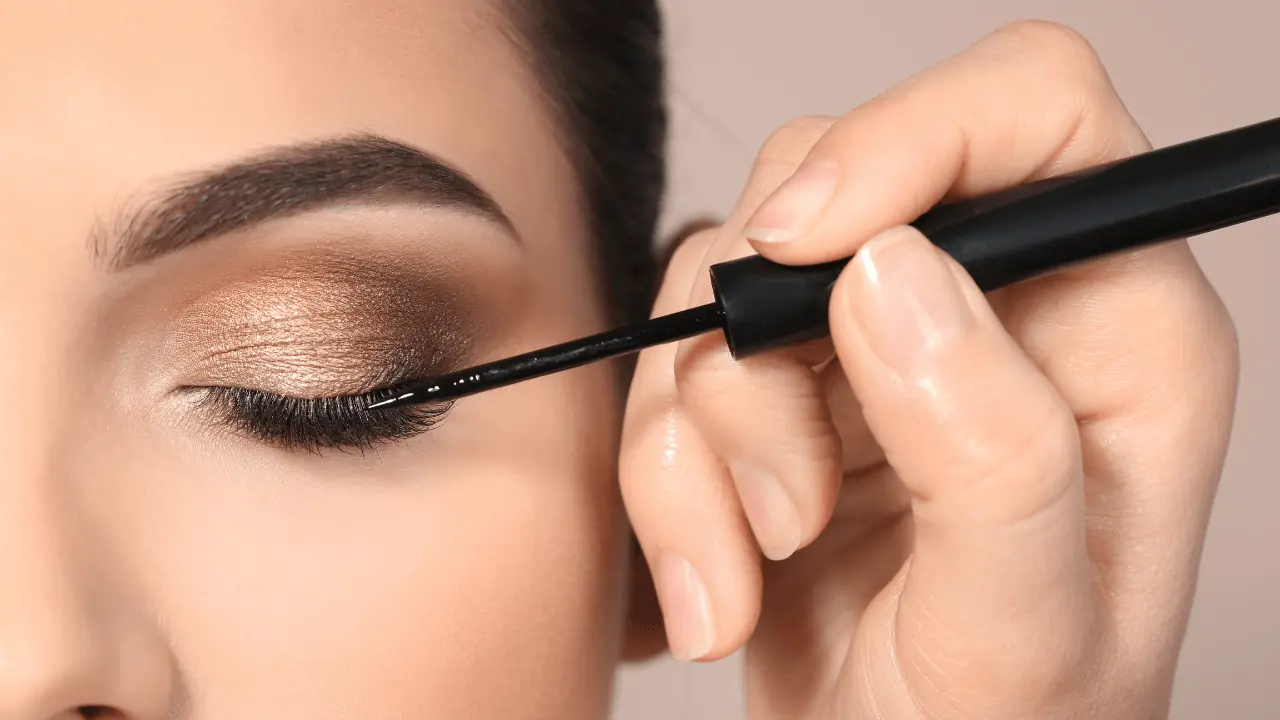
3. Master the Basics of Liquid Eyeliner Application
Liquid eyeliner can seem tricky, but with a steady hand and patience, you’ll get the hang of it. Here’s a step-by-step guide for beginners:
Step 1: Find a Comfortable Position
It’s important to be comfortable when applying liquid eyeliner. Sit at a table or desk with a mirror in front of you. Place your elbow on the table to stabilize your hand and prevent shaky lines. A steady hand is key to achieving a flawless look.
Step 2: Start with Thin, Short Strokes
When using liquid eyeliner for the first time, it’s best to start small and build up. Avoid trying to create one long, continuous line. Instead, use thin, short strokes and connect them as you go. This technique gives you more control and reduces the likelihood of mistakes.
Step 3: Begin at the Middle of the Lash Line
Start applying the liquid eyeliner from the center of your upper lash line. Begin by drawing a thin line close to the lashes. Once you’re comfortable, extend the line outward toward the outer corner of your eye. This ensures the most product is deposited where you want the emphasis—on the outer part of your eye.
Step 4: Connect the Inner Corner
After completing the outer half, carefully extend the eyeliner toward the inner corner of your eye, connecting the line seamlessly. Keep the inner line thinner, as this helps create a more natural look. You can always build up the thickness as needed.
Step 5: Perfect the Wing (Optional)
If you want to add a winged eyeliner look, this is where it gets fun. Extend the liner slightly past the outer corner of your eye, following the natural upward angle of your lower lash line. Draw a small diagonal line that points toward the end of your eyebrow, then connect it back to the outer corner of your lash line, creating a small triangle. Fill in the triangle for a clean, sharp wing.
Pro Tip: For beginners, try using a small piece of tape or a business card to guide your wing. Place it at the outer corner of your eye, following the natural angle of your lower lash line, to create the perfect line.
4. Fix Mistakes Without Ruining Your Makeup
Even the pros make mistakes when applying liquid eyeliner. The good news is, you don’t need to start over if you mess up.
- Use a Q-tip: Dampen a Q-tip with makeup remover and gently correct any smudges or uneven lines. This lets you fix small mistakes without having to redo your entire eye makeup.
- Concealer trick: For larger mistakes, use a bit of concealer on a clean brush or Q-tip to erase the error. This helps to sharpen the line and keep the rest of your makeup intact.
- Start over on one eye if necessary: If one eye isn’t matching the other, don’t hesitate to wipe off that side and start again. Liquid eyeliner takes practice, and getting a symmetrical look is often the hardest part.
5. Practice Winged Eyeliner Techniques
Creating the perfect winged eyeliner look takes some time and practice, but it’s a great way to add drama and definition to your eyes. Here are a few beginner-friendly techniques for winged eyeliner:
- Dotting technique: One trick for beginners is to use dots as guides for your wing. Start by placing a small dot where you want the end of your wing to be. Then, connect the dot back to your lash line and fill it in.
- Triangle method: Draw a small triangle at the outer corner of your eye and then fill it in. This method allows you to create a more controlled and consistent wing shape.
- Gradual build-up: Start with a small, subtle wing and gradually build up to a more dramatic wing over time. This helps you gain confidence and control before attempting more complex looks.
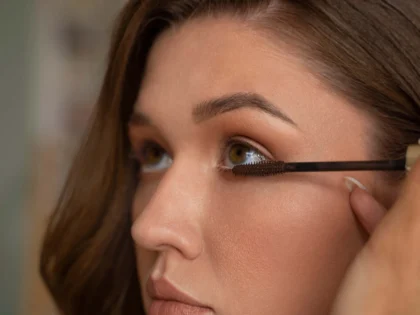
6. Finishing Touches
Once you’ve applied your liquid eyeliner, it’s time to finish off the look. Curl your lashes and apply mascara to complete your eye makeup. This step enhances the eyeliner and makes your eyes appear more open and defined.
- Mascara: A volumizing mascara will complement the eyeliner and add dimension to your lashes.
- Eyelash curler: Curling your lashes before applying mascara lifts them and makes your eyes look more awake.
7. Clean Your Tools
If you’re using a brush-tip liquid eyeliner, be sure to clean the brush regularly to prevent buildup and maintain a smooth application. A clean applicator is essential for precise lines.
8. Tips for Long-Lasting Wear
To ensure your liquid eyeliner stays put throughout the day, follow these tips:
- Use a primer: Apply an eyeshadow primer before your eyeliner to keep it in place and prevent smudging.
- Set with powder: After applying eyeliner, dust a translucent powder over your eyelids to absorb excess oil and lock in the liner.
- Choose waterproof formulas: If you have oily eyelids or plan to wear your makeup all day, opt for a waterproof liquid eyeliner to prevent smudging or fading.
Conclusion
Applying liquid eyeliner may seem challenging at first, but with the right tools and techniques, you can master the art in no time. Start by choosing the right product, prepping your lids, and practicing with thin strokes and short lines. Don’t be afraid to make mistakes—fixing them is part of the learning process. With consistent practice, you’ll soon be able to create everything from subtle, everyday looks to bold, dramatic wings like a pro.
At Avlon International, we offer a wide range of cruelty-free eyeliners that deliver precise, long-lasting results. Explore our collection and find the perfect eyeliner to enhance your makeup routine today!
FAQ’s:
1. What type of liquid eyeliner is best for beginners?
Felt-tip liquid eyeliners are ideal for beginners because they offer more control and are easier to apply.
2. How do I prevent my liquid eyeliner from smudging?
Use an eyeshadow primer before applying eyeliner, and choose a waterproof formula to ensure long-lasting wear.
3. How can I create a perfect winged eyeliner look?
Use a guide like a small piece of tape or try the dotting technique to create even, sharp wings.
4. How do I fix mistakes when applying liquid eyeliner?
Use a damp Q-tip or a bit of concealer to correct smudges or uneven lines without redoing your makeup.
5. What’s the best way to start applying liquid eyeliner?
Begin at the middle of the lash line with thin, short strokes, then connect the line toward the inner and outer corners.
6. Should I apply mascara after eyeliner?
Yes, applying mascara after eyeliner enhances the look by making your eyes appear more open and defined.
7. How can I make my eyeliner last all day?
Set your eyeliner with translucent powder and use a waterproof formula for long-lasting wear.
📌 Disclaimer
The information provided in this blog is for general informational purposes only. While Avlon International makes every effort to ensure the accuracy and reliability of the information shared, we make no representations or warranties of any kind, express or implied, about the completeness, accuracy, reliability, suitability, or availability with respect to the content.
Any reliance you place on such information is therefore strictly at your own risk. Avlon International shall not be held liable for any loss, damage, or inconvenience arising in connection with the use of this blog or its content.
For official details regarding our products, distributor policies, or business partnerships, please contact us directly at WhatsApp +91 88105 67775.